 WORLD PREMIERE PACK 2026
 REVOLUTION BOOSTER Toon Witchcrafter and Unchained
 CHAOS ORIGINS
 LIMIT OVER COLLECTION THE RIVALS
 THE VALUABLE BOOK EX6
 LIMIT OVER COLLECTION THE HEROES
 BLAZING DOMINION
 THE CHRONICLES DECK Spiritualist
 Yu-Gi-Oh OCG STORIES Volume 6
 JUMP FESTA 2026
 PREMIUM PACK 2026
 DUELIST BOX PRISMATIC SUMMON
 Yu-Gi-Oh OCG Structures Vol.11
 TERMINAL WORLD 3
 BURST PROTOCOL
Featured Card Ranking
Best Card Ranking by Card-Type
Best Monster Ranking by Type
Best Monster Ranking by Attribute
 DARK
DARK LIGHT
LIGHT EARTH
EARTH WATER
WATER FIRE
FIRE WIND
WIND DIVINE
Best Monster Ranking by Level
 Level 1 Best Monster
Level 2 Best Monster
Level 3 Best Monster
Level 4 Best Monster
Level 5 Best Monster
Level 6 Best Monster
Level 7 Best Monster
Level 8 Best Monster
Level 9 Best Monster
Level 10 Best Monster
Level 11 Best Monster
Level 12 Best Monster
Level 1 Best Monster
Level 2 Best Monster
Level 3 Best Monster
Level 4 Best Monster
Level 5 Best Monster
Level 6 Best Monster
Level 7 Best Monster
Level 8 Best Monster
Level 9 Best Monster
Level 10 Best Monster
Level 11 Best Monster
Level 12 Best Monster
Best Xyz Monster Ranking by Rank
 Rank 1 Best Xyz Monster
Rank 2 Best Xyz Monster
Rank 3 Best Xyz Monster
Rank 4 Best Xyz Monster
Rank 5 Best Xyz Monster
Rank 6 Best Xyz Monster
Rank 7 Best Xyz Monster
Rank 8 Best Xyz Monster
Rank 9 Best Xyz Monster
Rank 10 Best Xyz Monster
Rank 11 Best Xyz Monster
Rank 12 Best Xyz Monster
Rank 1 Best Xyz Monster
Rank 2 Best Xyz Monster
Rank 3 Best Xyz Monster
Rank 4 Best Xyz Monster
Rank 5 Best Xyz Monster
Rank 6 Best Xyz Monster
Rank 7 Best Xyz Monster
Rank 8 Best Xyz Monster
Rank 9 Best Xyz Monster
Rank 10 Best Xyz Monster
Rank 11 Best Xyz Monster
Rank 12 Best Xyz Monster
Best Link Monster Ranking by Link-Num
"RUM-axis RR" Deck 2015
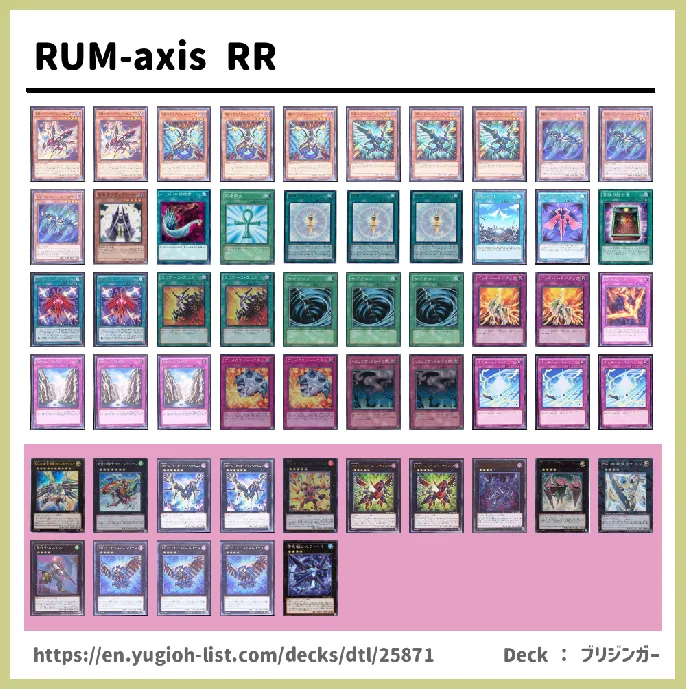
Deck Introduction/Deck Commentary
| Deck Category / how to win | |
|---|---|
| "Raidraptor" / Beatdown | |
| Key Card | |
| 《Raidraptor - Revolution Falcon》 | |
| Deck commentary | |
PlayingHer deck, RR, used by Kurosaki, who is very active in anime! StrengthI wrote it above, but in a nutshell, it's like searching, ranking up, annihilating, and then backing up and suppressing. WeaknessDue to the limited number of monsters, his Spell Trap can be stuck in your hand. If you hold 《Foolish Burial》and Summon Priest together, you can still smoothly transition to the preparation stage, but if it's all Spell Traps for obstruction, it's deadly. Once you set the strix and the search starts, it will start spinning around, so I want to get to the strix somehow while staying on the ground. CustomizeAlthough it is new for Clash of Rebellion, we plan to use one RUM Raptors Force, one RR Return, and three Raptors Gust. |
|
| Deck self-score | |
|
|
|
| Deck Maker | |
|
|
ブリジンガー ( Total 2 decks ) Posted date : 2015/02/27 16:18 |
| Main Deck (20 Types・40) | |||||||
|---|---|---|---|---|---|---|---|
| monster (5 Types・12) | |||||||
| Num | Name | Attribute | Level | Type | ATK / DEF | cheapest price | |
| 2 |
|
DARK | 4 | Winged Beast | 1700 / 1000 | ¥10 | |
| 3 |
|
DARK | 4 | Winged Beast | 1100 / 1900 | ¥20 | |
| 3 |
|
DARK | 4 | Winged Beast | 1300 / 1600 | ¥20 | |
| 3 |
|
DARK | 4 | Winged Beast | 1800 / 0400 | ¥18 | |
| 1 |
|
DARK | 4 | Spellcaster | 0800 / 1600 | ¥10 | |
| spell (9 Types・15) | |||||||
| 1 |
|
- | - | - | - | ¥38 | |
| 1 |
|
- | - | - | - | ¥98 | |
| 3 |
|
- | - | - | - | ¥15 | |
| 1 |
|
- | - | - | - | ¥25 | |
| 1 |
|
- | - | - | - | ¥30 | |
| 1 |
|
- | - | - | - | ¥10 | |
| 2 |
|
- | - | - | - | ¥10 | |
| 2 |
|
- | - | - | - | ¥25 | |
| 3 |
|
- | - | - | - | ¥10 | |
| trap (6 Types・13) | |||||||
| 2 |
|
- | - | - | - | ¥15 | |
| 1 |
|
- | - | - | - | ¥20 | |
| 3 |
|
- | - | - | - | ¥25 | |
| 2 |
|
- | - | - | - | ¥40 | |
| 2 |
|
- | - | - | - | ¥8 | |
| 3 |
|
- | - | - | - | ¥30 | |
| Extra Deck (11 Types・15) | |||||||
| 1 |
|
LIGHT | 10 | Dragon | 4000 / 2000 | ¥15 | |
| 1 |
|
WIND | 7 | Dragon | 2600 / 2100 | ¥150 | |
| 2 |
|
DARK | 6 | Winged Beast | 2000 / 3000 | ¥10 | |
| 1 |
|
FIRE | 5 | Dinosaur | 2500 / 1000 | ¥30 | |
| 2 |
|
DARK | 5 | Winged Beast | 1000 / 2000 | ¥10 | |
| 1 |
|
DARK | 4 | Dragon | 2500 / 2000 | ¥30 | |
| 1 |
|
LIGHT | 4 | Fairy | 2300 / 1600 | ¥242 | |
| 1 |
|
LIGHT | 4 | Warrior | 2500 / 2000 | ¥25 | |
| 1 |
|
WIND | 4 | Winged Beast | 2000 / 1500 | ¥15 | |
| 3 |
|
DARK | 4 | Winged Beast | 0100 / 2000 | ¥80 | |
| 1 |
|
WATER | 4 | Winged Beast | 2000 / 2200 | ¥28 | |
| Main deck minimum construction amount | ¥1676 | ||||||
Related deck
2021-11-25 【Gachi pure RR】
2021-07-03 【Sin Key Raidraptor】
2021-02-27 【Now RR Mist Valley Infinite Interference】
2021-02-23 【Raidraptor first control】
2020-09-18 【raid raptors arc】
2020-09-06 【RR [ Raidraptor ]】
2020-08-29 【Raidraptor Preemptive control type (from 2 cards in hand)】
2020-08-10 【RR-Wings of Rebellion Full Throttle 】
2020-08-09 【New entry pure RR】
2020-08-08 【Raidraptor Force Deck】
2020-07-29 【Raidraptor (touch illusion)】
2020-07-28 【Illusion RR (Hope Zexal type)】
2020-07-22 【A new Raidraptor with super-advancement (and a lot of interference)】
2020-07-19 【New Raidraptor】
2020-02-14 【Raidraptor single construction】
See all Deck Lists for "Raidraptor" ▼
| view num | 17692 | Score num | 10 | Score | 89 |
|---|
Update Information - NEW -
- 07/17 00:39 Review Paleozoic Cambroraster「Category exclusive link 2 monsters. If you write that much, it se…
- 07/16 23:34 Review Lady Labrynth of the Silver Castle「A princess who was motivated to carry two swords. Spe…
- 07/16 23:26 Review Xyz Reborn「It is a card that can be said to be 《Call of the Haunted》and 《Back to the …
- 07/16 23:21 Review Traptrix Arachnocampa「It's my personal opinion, but this girl will do it. she's a hell o…
- 07/16 21:49 Review Forbidden Droplet「In the Mauri series, the cost is high, but it is excellent in handling…
- 07/16 21:30 Review Cup of Ace「He is the type who can win if he spins, so he is a card that is put into the …
- 07/16 21:26 Review Evenly Matched「It is an answer card for the card group that earns square ads no matter w…
- 07/16 21:25 Review Lightning Storm「One of the second attacking card series Before returning to MD, I had th…
- 07/16 20:38 Review Snake Rain「Normal Spell that can drop 4 Reptiles to GY with 1 hand cost His GY sending i…
- 07/16 20:15 Review Gottoms' Second Call「The effect itself is strong, but the disadvantages are too heavy an…
- 07/16 20:04 Review Memory of an Adversary「A good illustration card that tells the story. 《Dimensional Pris…
- 07/16 20:04 Review Elemental HERO Heat「One of 《E・HERO》but not Warrior ATT increases by 200 for the numbe…
- 07/16 19:50 Review Elemental HERO Wildheart「It is one of the "Elemental HERO" and has complete resistance t…
- 07/16 18:18 Review Evenly Matched「If you ask me what is the strongest flip card to attack, I would answer t…
- 07/16 17:43 Review Dark Ruler No More「One of the three Sacred Treasures of the second-attack flipping card,…
- 07/16 16:27 Review Shinobaron Peacock「The 3-card bounce is powerful if you can get through it, and if you c…
- 07/16 16:23 Review Shinobaroness Peacock「The recruit effect of (1) cannot be used unless he has a Spell/Tra…
- 07/16 16:13 Review Shinobird's Calling「An excellent ritual card that can use the spirit of GY as a material…
- 07/16 15:58 Review Millennium-Eyes Restrict「《Thousand-Eyes Restrict》remake card There is also a dedicated…
- 07/16 15:51 Review Tearlaments Kitkallos「Prohibited on paper, restricted on MD. If you go first, add a depl…
- 07/16 15:43 Review Underground Arachnid「In the 6th generation Insect ☆ 6S It has the effect of suppressing …
- 07/16 14:30 Review Lancer Archfiend「It's an effect that pierces one monster, but if that's all it is, Equip…
- 07/16 14:21 Review Mirror Ladybug「Comprehensive evaluation: 《Exodius the Ultimate Forbidden Lord》in combi…
- 07/16 14:18 Review Swift Scarecrow「Overall Rating: A useful defensive tag. Unlike 《Battle Fader》, he want…
- 07/16 14:13 Review Lancer Archfiend「Comprehensive evaluation: Even if penetration grant is carried out, the…
- 07/16 14:10 Review Power Breaker「Comprehensive evaluation: The range which can be destroyed is narrow. Hi…
- 07/16 14:08 Review Extra Veiler「Comprehensive evaluation: It becomes a measure against burn 1 kill. He's th…
- 07/16 14:05 Review Blackwing - Abrolhos the Megaquake「Overall Rating: Release 2 is heavy and hard to use wi…
- 07/16 13:58 Review Karakuri Ninja mdl 339 "Sazank"「Overall Rating: Non-destructive removal is useful, but d…
- 07/16 13:53 Review Karakuri Soldier mdl 236 "Nisamu"「Comprehensive evaluation: Since the deployment power h…
- 07/16 13:39 Review Karakuri Strategist mdl 248 "Nishipachi"「Comprehensive evaluation: I would like to adopt…
- 07/16 13:29 Review Angelica, Princess of Noble Arms「I'm in trouble. I only write strong things. There are n…
- 07/16 13:26 Review Attack Gainer「Comprehensive evaluation: It is useful in the point that Warrior support c…
- 07/16 13:23 Review Creation Resonator「Comprehensive evaluation: The effect is strong and it is good to sear…
- 07/16 13:17 Review Blackwing - Etesian of Two Swords「Comprehensive evaluation: It is better to strengthen w…
- 07/16 13:14 Review Karakuri Bushi mdl 6318 "Muzanichiha"「Overall evaluation: It's tough if he doesn't destr…
- 07/16 13:11 Review Watthopper「Comprehensive evaluation: Since there are many effects that do not take targe…
- 07/16 13:03 Review Wattsquirrel「Comprehensive evaluation: Can he go if he supplements ATK with 《Power of t…
- 07/16 13:00 Review Wattdragonfly「Overall Rating: Passive but easy to recruit. It can be recruited by both e…
- 07/16 12:51 Review Mother Spider Splitter「(1) is the same as 《Primitive Butterfly》, but it is suitable fo…
- 07/16 12:08 Review Mother Spider Splitter「A monster with a recruit effect while having a self-SS with loose…
- 07/16 12:07 Review Naturia Pumpkin「Comprehensive evaluation: After deploying 《Naturia Mole Cricket》, it i…
- 07/16 09:24 Review Interdimensional Warp「A card that is full of value in one point, "It's a free chain cont…
- 07/16 08:10 Review Darklord Edeh Arae「Is this really an annual subscription benefit? At least if his ATK wa…
- 07/16 02:19 Review Tearlaments Grief「A normal frame for the "Tearlaments" spell, which is neatly distribute…
- 07/16 02:09 Review Evenly Matched「Needless to say, it's a back attack card. With this one card, you can for…
- 07/16 00:17 Review Aratama「As Exosister Aratama, a rogue who is caught between yuri. Jokes aside, this one …
- 07/15 22:41 Review Laevatein, Generaider Boss of Shadows「Participated in Master Duel from 2023/07/13. A ran…
- 07/15 21:17 Review Malefic Cyber End Dragon「Speaking of Malefic, this is the kind of card. It boasts the be…
- 07/15 20:45 Review Naturia Cherries「Comprehensive evaluation: It is a difficult point that it cannot be use…
- 07/12 21:10 DECK The Yubel Family ~Living in the Silver Castle~
- 07/11 23:48 DECK Isolde Exo for MD
- 07/11 23:37 DECK Curioswight Grave
- 07/10 15:46 DECK Exodia Align Deck
- 07/10 02:32 DECK Libromancer & Dogmatika
- 07/09 21:00 DECK Synchro Undead (Extra Unified Race)
- 07/08 15:00 DECK Darth Metatron (Metalfoes Brave Pacificis)
- 07/08 12:11 DECK Sin Buster Blader
- 07/08 00:53 DECK Kaiju NTR
- 07/05 02:45 DECK Red Archfiend
- 07/03 23:04 DECK BFRRMore
- 07/02 17:35 DECK [MD] Vaylantz Griffon type
- 07/02 11:18 DECK Red Archfiend King's Heartbeat (advice sought)
- 07/02 10:55 DECK Labrynth for New Banned Restrictions (advice sought)
- 07/01 13:55 DECK Star 12 Jund in20230701
- 06/30 17:16 DECK Ritual Dogmatika July 2023 version
- 06/28 07:31 DECK [Pure Construction] Red Archfiend
- 06/27 16:02 DECK VS Homura Noble Knight
- 06/27 08:39 DECK [Preceding One Kill] Abyssal Dragunity
- 06/26 00:35 DECK The Six Samurai (2023.07.01)